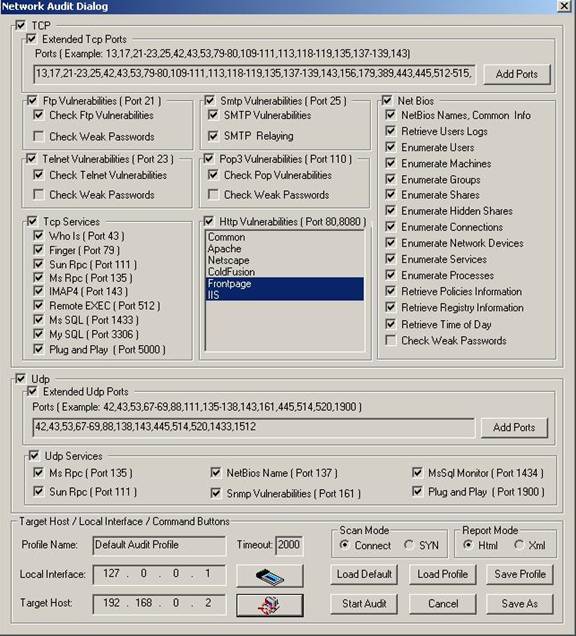
Network Auditor is a tool to discover the network services and to check them for discovering well known vulnerabilities. This tool creates an audit report. The auditor consists in two main parts: TCP and UDP. To enable an option ( options ) select appropriate checkboxes.
The enabled Extended Tcp Ports ( Extended Udp Ports ) feature contains the number of ports, used to audit the network. You can add ports by clicking on the Add Ports button and selecting port from Ports Dialog.

To audit ftp vulnerabilities enable Ftp Vulnerabilities option. This option allows you to check Ftp Vulnerabilities and Weak Passords . To audit smtp vulnerabilities enable Smtp Vulnerabilities option.
This option allows you to check SMTP Vulnerabilities and SMTP Relaying. To audit telnet vulnerabilities enable Telnet Vulnerabilities option. This option allows you to check Telnet Vulnerabilities and Weak Passwords . To audit pop3 vulnerabilities enable Pop3 Vulnerabilities option. This option allows you to check Pop Vulnerabilities and Weak Passwords.
To audit different Net Bios settings you can enable some or all Net Bios options including NetBios Names, User Logs, Users, etc.
To audit different Tcp services you can enable some or all Tcp Services including Who Is, Finger, etc.
To audit http vulnerabilities enable Http Vulnerabilities option.
To audit different Udp services you can enable some or all Udp Services including Dns Vulnerabilities, Sun Rpc, Snmp Vulnerabilities , Plug and Play Vulnerabilities, MsSql Monitor.
You can change scan mode from Connect to SYN. You can also select one of the following report modes
XML or HTML.
The field Profile Name contains the profile name. The profile can be loaded by clicking on the Load Profile button and selecting the file name ( The profile file is stored in XML format ).
Clicking on the Load Default button loads the default profile. Clicking on the Save Profile button will save the profile in the selected file. You can save the profile in another file by clicking on the Save As button.
To start auditing clicking on the Start Audit button .
To close the dialog click on the Cancel button.
To load an interface click on the Local Interface button. Clicking on this button opens the
Available Network Interfaces dialog.
Clicking on the button Target Host opens the Host Range and Credentals Selection Dialog.
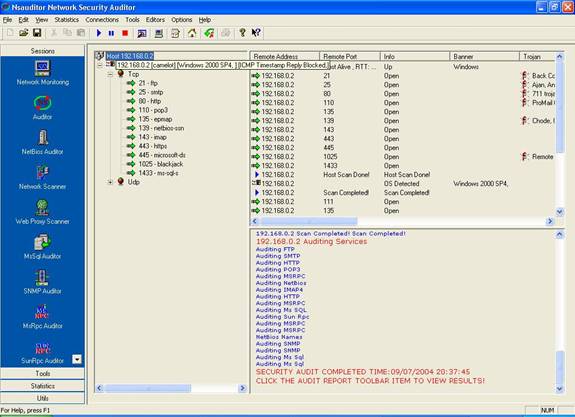
After the auditing process is started the Network Audit Dialog will be closed and the view that shows
the audit process will appear in the screen.
The left part of the view contains all selected TCP and UDP ports. The top of the right part contains the remote host settings including Remote Address, Remote Port , Info, Banner, Trojan, Service Name, Service Description. The bottom of the right part contains information about the current auditing process.

|

